The XCUITest framework is growing in popularity. Here, we break down what XCUITest is, why use it, and how to use it.
Back to topWhat Is the XCUITest Framework?
XCUITest is a UI testing framework launched by Apple in 2015.
The XCUITest framework is part of XCode. This allows you to easily develop UI tests that reflect the users’ interface with the application.
Back to topWhy The XCUITest Framework Is Popular
Development teams have started to adopt XCUITest to get fast and reliable feedback. There are five reasons why XCUITest is popular.
1. Intuitive
Using XCUITest is quite intuitive for developers as it runs from within the XCode IDE.
2. Fast
Test execution against iOS devices is faster than any other UI test automation tool due to the framework architecture
3. Reliable
Due to the architecture of the framework, test execution using XCUITest generates more reliable results and eliminates flakiness
4. Mature
The APIs and the framework became significantly more mature during the last year
5. Test Maintenance
Since the app has been instrumented, the framework works directly at the object level which reduces maintenance efforts that usually happen due to changes in the applications.
Back to topHow the XCUITest Framework Supports CI
It's important that automated testing supports CI. Using XCUITest as your framework can help.
For instance, many teams still execute their tests on simulators/local devices from the developers workstation. By using XCUITest, you can get more value out testing. Especially when you execute XCUITest as part of your CI processes. This allows you to get continuous feedback on real devices and end-user conditions.
Back to topHow Do I Use XCUITest?
Here's how to use XCUITest.
1. Set Up Your XCode Project
First, you'll need to get started with XCode, if you haven't already. Get started >>
XCUITest is part of XCode. So, you'll be able to use this framework within XCode.
2. Generate Your Test IPA Package in XCUITest
When you're ready to test your app, you'll generate your test IPA package.
You can do this by going to Product in the menu, selecting Build For, and then Testing.
This generates the test package.
3. Integrate XCUITest With the Right Tools
To get the most out of XCUITest, you'll want to integrate it with the right tools.
By integrating Perfecto and XCUITest, you'll get:
- Easy test automation setup and creation.
- Stable test execution in the cloud.
- Scalable testing in parallel and enhanced coverage.
- Detailed reporting and fast feedback.
Example: Run XCUITest Automation on Multiple Devices With Perfecto
Of course XCUITest cases can only be executed on a single device at a time. So if you want to run these tests in parallel, you will not be able to do this out of the box.
Here's how to run XCUITest in parallel with the Quantum framework on Perfecto Cloud.
1. Create IPA Test Files
As noted above, you'll need to create your IPA test files first.
Here are two IPA test files you can use, available on GitLab:
After the IPA files are built, you'll upload these files onto your Perfecto-hosted cloud repository.
2. Prepare Your Quantum Project
Next, you'll download and install QAF start project.
In this example, we're using IntelliJ Community Edition as the IDE, with the PerfectoContinuous Quality Lab plugin.
After you've installed QAF, make edits to the application.properties file under resources folder. Change the following to your user credential and hosted-cloud domain name:
Next, you will need to create a custom steps file, and place it under the steps folder (src/main/java/com.quantum/steps).
Right-click on steps folder -> New -> File, and then name it and save it as XCUITestStepsDefs.java.
Then add the following code as shown below. Make sure you are referencing to the test IPA files that you had created earlier.

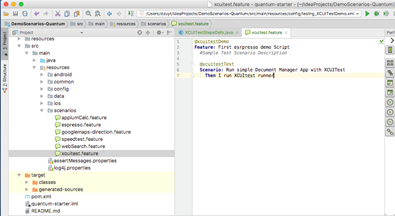
Now, we need to create a scenario file and place it under scenario folder (src/main/resources/scenarios).
Right-click on scenarios folder -> New -> File, and then name it and save it as xcuitest.feature
Then add the following code as shown below:
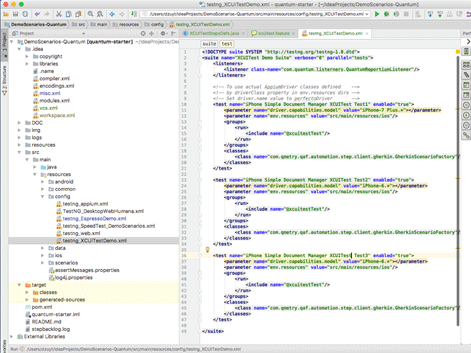
The final file we need is a TestNG configuration file to allow us to run multiple devices in parallel. Therefore, we need to create this file and place it under config folder (src/main/resources/config).
Right-click on config folder -> New -> File, and then name it and save it as testng_XCUITestDemo.xml (or whatever name make sense).
We'll set it up to run three different iPhone devices in parallel. The selection of device is set to be any available iPhone S-type phone. However, if you want to select a specific device then you need to change the parameter capabilities from “model” to “deviceName” and set it with the device UDID number.

In my example, I will be using the wildcard for iPhone. And each of my test suites are unique.
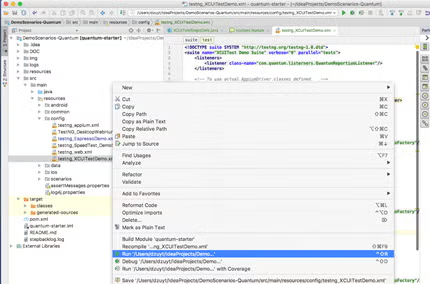
3. Run XCUITest on Multiple Devices in Parallel
Right-click on testng_EspressoDemo.xml file -> and select “Run…” from menu item.
View the all devices running XCUITest script. Click on Perfecto Dashboard pane to view devices testing in progress.
 Back to top
Get Started With XCUITest Automation — and Perfecto
Perfecto recently released advanced support for XCUITest. This enables development teams to utilize the advantages of XCUITest, while also leveraging Perfecto’s cloud-based capabilities.
In addition, Perfecto extended the XCUITest framework by adding the ability to control and setup the device the same way end users do. This enables teams to validate that their apps will function as expected in the real world.
See how Perfecto works across mobile, web, and desktop testing, scriptless automation, AI-driven execution, and analytics in these guided demos.